SELECT CASE WHEN wait_event_type ISNULLTHEN'CPU/Running (no wait)' WHEN wait_event_type IN ('Lock', 'LWLock', 'BufferPin') THEN'Lock/Contention' WHEN wait_event_type ='IO'THEN'IO' ELSE'Wait: '|| wait_event_type ENDAS bottleneck_class, coalesce(wait_event, '(none)') AS wait_event, count(*) AS backends, string_agg(DISTINCT state, ', ') AS states FROM pg_stat_activity WHERE backend_type ='client backend' AND pid <> pg_backend_pid() GROUPBY1, 2 ORDERBY backends DESC;
SELECT query, calls, mean_exec_time, max_exec_time, stddev_exec_time, rows::numeric/nullif(calls, 0) AS mean_rows FROM pg_stat_statements WHERE calls >50 ORDERBY mean_exec_time DESC LIMIT 20;
看「當下正在跑」的查詢與它在等什麼
state='active' 且 wait_event_type IS NULL 的那一列,就是你正在燒 CPU 的查詢:
1 2 3 4 5 6 7 8 9 10 11 12
SELECT pid, now() - query_start AS query_duration, now() - xact_start AS xact_duration, state, wait_event_type, wait_event, query FROM pg_stat_activity WHERE state ='active' AND pid <> pg_backend_pid() AND backend_type ='client backend' ORDERBY query_start ASC;
想只看長時間跑的,加上 AND now() - query_start > interval '5 seconds'。
SELECT pid, usename, datname, state, wait_event_type, now() - xact_start AS xact_duration, now() - query_start AS query_duration, query FROM pg_stat_activity WHERE pid <> pg_backend_pid() AND backend_type ='client backend' AND state IN ('idle in transaction', 'active') AND xact_start ISNOT NULL ORDERBY xact_duration DESCNULLS LAST;
看連線數分佈(連線太多 = CPU + 記憶體雙重負擔)
1 2 3 4 5
SELECT state, count(*) FROM pg_stat_activity WHERE pid <> pg_backend_pid() GROUPBY state ORDERBY state ASC;
SELECT pid, wait_event_type, wait_event FROM pg_stat_activity WHERE wait_event_type ='Lock';
Blocking 樹:被鎖的 backend ↔ 鎖住它的 backend
pg_blocking_pids()(PG9.6+)是關鍵,直接把「誰被誰擋住」攤開:
1 2 3 4 5 6 7 8 9 10 11 12
SELECT blocked.pid AS blocked_pid, blocked.usename AS blocked_user, blocked.query AS blocked_query, blocking.pid AS blocking_pid, blocking.usename AS blocking_user, blocking.state AS blocking_state, blocking.query AS blocking_query, now() - blocking.xact_start AS blocking_xact_age FROM pg_stat_activity AS blocked JOINLATERALunnest(pg_blocking_pids(blocked.pid)) AS b(blocking_pid) ONtrue JOIN pg_stat_activity AS blocking ON blocking.pid = b.blocking_pid WHERE blocked.wait_event_type ='Lock';
直接看 pg_locks(過濾未授予的鎖 = 正在等的)
1 2 3 4 5 6 7
SELECT l.pid, l.locktype, l.mode, l.granted, l.relation::regclass AS relation, a.state, a.query FROM pg_locks l JOIN pg_stat_activity a ON a.pid = l.pid WHERENOT l.granted ORDERBY l.pid;
SELECT pid, state, now() - xact_start AS xact_age, now() - state_change AS idle_duration, wait_event_type, wait_event, backend_xmin, query AS last_query FROM pg_stat_activity WHERE state IN ('idle in transaction', 'idle in transaction (aborted)') ORDERBY xact_start ASC;
SELECT datname, blks_read, blks_hit, round(blks_hit::numeric/nullif(blks_hit + blks_read, 0), 4) AS cache_hit_ratio FROM pg_stat_database WHERE datname = current_database();
Heap / Index 命中率
1
2
3
4
5
6
7
8
9
10
11
12
13
14
15
-- Heap (資料表本體) SELECT sum(heap_blks_read) AS heap_read, sum(heap_blks_hit) AS heap_hit, sum(heap_blks_hit)::numeric /nullif(sum(heap_blks_hit) +sum(heap_blks_read), 0) AS ratio FROM pg_statio_user_tables;
-- Index SELECT sum(idx_blks_read) AS idx_read, sum(idx_blks_hit) AS idx_hit, sum(idx_blks_hit)::numeric /nullif(sum(idx_blks_hit) +sum(idx_blks_read), 0) AS ratio FROM pg_statio_user_indexes;
SELECT query, calls, blk_read_time, blk_write_time, blk_read_time + blk_write_time AS total_io_time FROM pg_stat_statements ORDERBY total_io_time DESC LIMIT 20;
找沒被用到的索引(浪費寫入與記憶體)
沒用到的索引會拖慢寫入、佔記憶體、還會排擠 cache。idx_scan = 0 就是候選:
1 2 3 4 5 6 7 8 9 10 11 12 13 14 15 16 17
SELECT n.nspname AS schemaname, c.relname AS tablename, c.reltuples::bigintAS num_rows, pg_size_pretty(pg_relation_size(c.oid)) AS table_size, psai.indexrelname AS index_name, pg_size_pretty(pg_relation_size(i.indexrelid)) AS index_size, CASEWHEN i.indisunique THEN'Y'ELSE'N'ENDAS "unique", psai.idx_scan AS number_of_scans FROM pg_class c JOIN pg_namespace n ON n.oid = c.relnamespace JOIN pg_index i ON c.oid = i.indrelid JOIN pg_stat_all_indexes psai ON i.indexrelid = psai.indexrelid WHERE c.relkind IN ('r', 'p') AND n.nspname NOTIN ('pg_catalog', 'information_schema') -- AND psai.idx_scan = 0 -- 取消註解可只看「完全沒用到」的索引 ORDERBY1, 2;
小到中型欄位但偶爾很大(如 JSONB)→ 可考慮 MAIN,讓 hot data 留在 main table 減少 TOAST 查表。
1 2 3 4 5 6
-- 觀察與調整 SELECT attname, attstorage FROM pg_attribute WHERE attrelid ='my_table'::regclass AND attnum >0; -- attstorage: p = PLAIN, e = EXTERNAL, x = EXTENDED, m = MAIN
ALTER TABLE my_table ALTERCOLUMN payload SET STORAGE EXTERNAL;
每個有變長度欄位的 user table,PostgreSQL 會自動幫它建立一張對應的 TOAST 表,位於 pg_toast schema:
1
2
3
4
5
6
7
8
SELECT c.relname AS main_table, t.relname AS toast_table, pg_size_pretty(pg_relation_size(c.reltoastrelid)) AS toast_size, pg_size_pretty(pg_relation_size(c.oid)) AS main_size FROM pg_class c JOIN pg_class t ON t.oid = c.reltoastrelid WHERE c.relname ='my_table';
TOAST 表的 schema 永遠是這三欄:
1 2 3 4 5 6 7
CREATE TABLE pg_toast.pg_toast_<oid> ( chunk_id oid NOT NULL, -- 對應 va_valueid chunk_seq intNOT NULL, -- 0, 1, 2, ... 切塊序號 chunk_data bytea NOT NULL-- 約 2KB 的資料碎塊 ); CREATEUNIQUE INDEX pg_toast_<oid>_index ON pg_toast.pg_toast_<oid> (chunk_id, chunk_seq);
ALTER TABLE my_table ALTERCOLUMN payload SET COMPRESSION lz4;
特性
pglz (預設)
lz4
Compression speed
較慢
約 4–5 倍快
Decompression speed
較慢
約 10 倍快
Compression ratio
略好 (≈ 5–10%)
略差
需要編譯選項
內建
--with-lz4
對於寫多讀多、且 CPU 比 I/O 緊的場景,LZ4 幾乎是無腦選擇。只有極度在意 compression ratio(冷資料、空間敏感)才該留著 pglz。
八、實用 SQL:觀察 TOAST 的真實樣貌
1. 看一張表的 TOAST 表佔用
1
2
3
4
5
6
7
8
9
10
SELECT relname, pg_size_pretty(pg_table_size(oid)) AS table_size, pg_size_pretty(pg_relation_size(oid)) AS heap_size, pg_size_pretty(pg_relation_size(reltoastrelid)) AS toast_size, pg_size_pretty(pg_indexes_size(oid)) AS index_size FROM pg_class WHERE relkind ='r'AND reltoastrelid <>0 ORDERBY pg_table_size(oid) DESC LIMIT 10;
2. 直接戳 TOAST 表 (進階,需 superuser)
1 2 3 4 5 6
-- 看某個 chunk_id 被切成幾塊 SELECT chunk_id, count(*) AS chunks, sum(octet_length(chunk_data)) AS bytes FROM pg_toast.pg_toast_16384 GROUPBY chunk_id ORDERBY bytes DESC LIMIT 5;
3. 判斷某筆資料有沒有被 TOAST
1 2 3 4 5 6
SELECT id, pg_column_size(payload) AS stored_size, -- 含 header、compressed 後 octet_length(payload) AS logical_size, -- 邏輯長度 pg_column_compression(payload) AS compression -- 'pglz' / 'lz4' / NULL FROM my_table WHERE id =1;
There is an uncomfortable mismatch between rust’s memory allocation and postgres’s; rust tries to clean memory by using stack-based destructors, while postgres does so using arenas. … we use postgres’s MemoryContexts to manage memory, even though this is not strictly speaking safe.
pg_dbmigrator is a Rust-based CLI and library for moving PostgreSQL databases between two endpoints. It supports two strategies under one tool:
Offline mode — a one-shot pg_dump → pg_restore, suitable for maintenance windows.
Online mode — a streaming pipeline built on PostgreSQL’s logical replication that copies the initial snapshot, then continuously applies WAL changes until you trigger cutover.
If you’ve ever had to migrate a busy PostgreSQL database between hosts, regions, or cloud providers (on-prem → RDS, RDS → Aurora, Azure → AWS, major-version upgrades, etc.), the online mode is what makes pg_dbmigrator interesting: the source database stays writable during the entire copy, and downtime is reduced to the few seconds it takes to flip the application’s connection string.
This post walks through how the tool works, how to operate it end-to-end, and what to watch for in production.
Why Another Migration Tool?
PostgreSQL ships with the building blocks — pg_dump, pg_restore, CREATE PUBLICATION, CREATE SUBSCRIPTION, replication slots — but stitching them together correctly is surprisingly easy to get wrong. Common mistakes:
Dumping before creating the slot, so you have no consistent starting LSN.
Creating the slot after the dump, missing changes that occurred during the dump.
Forgetting to use EXPORT_SNAPSHOT so the dump and the replication start point don’t align.
Cutting over while the subscriber is still lagging behind, losing writes.
pg_dbmigrator encodes the correct order as a state machine, surfaces lag metrics, and lets the operator drive the cutover when ready.
Migration Modes at a Glance
Offline mode — one shot, with downtime
The source must be quiesced (writes stopped) before the dump starts. Anything written after the dump begins will be lost. The whole migration is a single linear pipe:
Downtime ≈ time to dump + time to restore. Simple, but every minute is user-visible.
Online mode — copy + replay, cutover on demand
Two things run back-to-back on the same timeline. First, an initial snapshot copy (just like offline). Then, while the target catches up, a logical-replication stream keeps replaying every change that happened on the source after the snapshot — including writes that arrived during the dump. The source stays writable the whole time.
Phase 1: initial copy ┌────────┐ snapshot dump ┌────────┐ │ Source │ ───────────────▶ │ Target │ └────────┘ └────────┘ │ (slot created BEFORE dump, │ so we know the exact LSN │ the dump corresponds to) │ ▼ Phase 2: streaming catch-up (runs continuously) ┌────────┐ WAL changes via ┌────────┐ │ Source │ logical replication ─────▶ │ Target │ └────────┘ (fromthe slot's LSN) └────────┘ │ │ Source stays writable. Lag shrinks overtime. │ ▼ Phase 3: cutover (operator-driven) 1. Stop app writes onthe source 2. Wait until lag = 0 3. Press Ctrl+C → pg_dbmigrator stops cleanly 4. Repoint the app atthe target
The trick that makes this work: the replication slot is created before the dump and exports a snapshot. The dump uses that snapshot, and the stream starts at the slot’s LSN — so the stream picks up exactly where the dump left off. No gap, no duplicates.
Rule of thumb: pick offline when you can afford a maintenance window the size of (dump + restore). Pick online when you can’t.
Online Mode: The State Machine
Internally pg_dbmigrator runs the online migration as a sequence of phases:
Runs VACUUM ANALYZE on the source to reclaim dead tuples and refresh planner statistics before the dump. Skip with --skip-source-vacuum.
PrepareSnapshot
Creates the logical replication slot with EXPORT_SNAPSHOT. Streaming is deferred until after the dump completes; the exported snapshot ID is what makes the dump consistent with the slot’s starting LSN.
Dump
Runs pg_dump --snapshot=<exported_id> so the dump reflects the database state exactly at the slot’s starting LSN.
Restore
pg_restore into the target. Parallelized with --jobs and split-sections (indexes rebuilt in parallel) by default.
Analyze
Runs ANALYZE on the target so the first application queries have fresh statistics. Skip with --skip-analyze.
StreamApply
Starts START_REPLICATION from the slot’s LSN and applies decoded changes onto the target.
Lag heartbeat
Polls pg_current_wal_flush_lsn() on the source on a tunable interval, logs the delta against the receiver/applied LSN.
CaughtUp
Fires once lag falls below --lag-threshold-bytes, signalling the operator that cutover is safe. The threshold is advisory only — it does not auto-trigger cutover.
Cutover
Triggered by SIGINT (Ctrl+C). Flushes the final LSN feedback, syncs sequences on the target, then disables and drops the subscription.
SourceCleanup
After cutover, drops auto-created publications and the replication slot on the source. Failures are logged as warnings but don’t abort.
The key invariant: the slot is created before the dump, and the dump uses the slot’s exported snapshot. That way the WAL stream picks up exactly where the dump ended — no gap, no overlap.
Installation
pg_dbmigrator is published on crates.io:
1 2
cargo install pg_dbmigrator pg_dbmigrator --help
Or build from source:
1 2 3
git clone https://github.com/isdaniel/pg_dbmigrator cd pg_dbmigrator cargo install --path crates/pg_dbmigrator-cli
You also need pg_dump and pg_restore on the PATH — the tool shells out to them rather than reimplementing the dump format. Make sure their major version is >= the source database’s major version, otherwise you’ll hit compatibility errors during dump.
Source Prerequisites
Online mode requires a few server settings on the source:
That’s it for setup — pg_dbmigrator will auto-create the publication (FOR ALL TABLES) on first run if it doesn’t already exist, and clean it up after cutover. If you’d rather manage the publication yourself (e.g. to scope it to a subset of tables), pre-create it and pass --no-auto-create-publication:
The connecting role needs REPLICATION and the ability to read every table in the publication. On managed services:
AWS RDS: set rds.logical_replication = 1 in the parameter group, then reboot.
Azure Database for PostgreSQL: enable the logicalwal_level server parameter.
Google Cloud SQL: enable cloudsql.logical_decoding.
The target doesn’t need wal_level = logical unless you plan to chain replication out of it.
Resource Lifecycle
By default, pg_dbmigrator owns the resources it creates and cleans them up when the migration finishes. Override the cleanup if you need the resource to outlive the migration:
Name of the logical replication slot created on the source. Pick something recognizable so you can clean it up if the migration is aborted.
--publication
Publication name. Defaults to pg_dbmigrator_pub; auto-created FOR ALL TABLES if missing.
--subscription-name
Name pg_dbmigrator gives the subscription it creates on the target.
--jobs
Parallelism for the initial pg_restore. Auto-detected from CPU count and clamped to [1, 8] if omitted.
--lag-threshold-bytes
When the gap between source flush LSN and applied LSN drops below this, the tool emits a “ready to cut over” signal. Advisory only — it does not auto-trigger cutover.
--cutover-poll-secs
How often the lag heartbeat polls pg_current_wal_flush_lsn().
Useful additional flags:
--drop-target-first — recreate the target schema cleanly. Necessary on most fresh runs.
--no-auto-create-publication — skip auto-creation; use a publication you manage yourself (also skips its cleanup).
--keep-slot / --keep-subscription — leave the slot or subscription in place after cutover instead of dropping them. Handy for keeping a rollback window.
--no-sequence-sync — skip the automatic setval() pass at cutover. Use when the target role lacks the privileges; you’ll need to advance sequences manually.
--exclude-schema / --exclude-table — repeat to omit specific schemas or tables from the dump.
--skip-source-vacuum / --skip-analyze — disable the pre-dump VACUUM ANALYZE on the source or the post-restore ANALYZE on the target. Useful when the source is already well-vacuumed or when you want to control the maintenance window yourself.
--dump-compress — archive compression spec. Defaults to lz4:1; alternatives include zstd:3 or none.
--no-split-sections — disable parallel section restore. Split sections are 30–60% faster on index-heavy schemas, so only flip this off if the parallel restore is misbehaving.
--allow-restore-errors — treat pg_restore errors as warnings. Useful when the target is a managed service that reserves extension names (Azure-reserved extensions, missing pg_cron, etc.).
What You’ll See in the Terminal
Once StreamApply starts, the tool prints periodic heartbeats:
1 2 3 4 5 6 7
[INFO] StreamApply: replication lag 1,245,184 bytes (source LSN 0/1A2B3C4D, received LSN 0/1A1F0000, applied LSN 0/1A1E8000) [INFO] StreamApply: replication lag 524,288 bytes (source LSN 0/1A2C1000, received LSN 0/1A2B9000, applied LSN 0/1A2B8000) [INFO] StreamApply: replication lag 4,096 bytes (source LSN 0/1A2D5000, received LSN 0/1A2D4000, applied LSN 0/1A2D4000) [INFO] CaughtUp: lag below 8,192 bytes — safe to cut over
The lag is the byte distance between the source’s current flush LSN and the target’s applied LSN. Watch it converge before cutting over.
Driving the Cutover
Cutover is operator-driven, not automatic. This is intentional — only you know when the application is in a state where it can be flipped. The flow:
Wait for CaughtUp to appear (or for the lag to be acceptable).
Stop application writes to the source (put the app in maintenance, revoke writes, or fail over the load balancer).
Wait one more heartbeat to confirm lag is 0 bytes.
Press Ctrl+C (single SIGINT). pg_dbmigrator:
Stops the apply loop at the current LSN and flushes the final feedback message.
Syncs sequences on the target via setval() (skip with --no-sequence-sync).
Disables and drops the subscription on the target (unless --keep-subscription).
Drops the replication slot and any auto-created publication on the source (unless --keep-slot or --no-auto-create-publication).
Exits cleanly.
Repoint the application’s connection string to the target.
A second Ctrl+C is an escape hatch — if shutdown is stuck, hitting it again forces termination. Use only as a last resort, since the slot may be left behind on the source (drop manually with SELECT pg_drop_replication_slot('pg_dbmigrator_slot');).
A Realistic Online Migration Recipe
Putting it together, here’s the sequence I’d run for a real migration from on-prem to RDS:
# 1. On the source, one-time setup psql "$SOURCE" <<'SQL' ALTER SYSTEM SET wal_level = 'logical'; SQL # Restart source PostgreSQL. # (No need to pre-create the publication — pg_dbmigrator will auto-create # pg_dbmigrator_pub FOR ALL TABLES on first run, and clean it up at cutover.)
# 2. Kick off the migration in a tmux/screen session you can leave running. pg_dbmigrator \ --mode online \ --source"$SOURCE" \ --target "$TARGET" \ --slot-name pg_dbmigrator_slot \ --publication pg_dbmigrator_pub \ --subscription-name pg_dbmigrator_sub \ --jobs 8 \ --lag-threshold-bytes 16384 \ --cutover-poll-secs 5 \ --drop-target-first
# 3. (In another terminal) sanity-check row counts as the dump completes, # and watch lag heartbeats.
# 4. When CaughtUp fires and you're ready: # a. Put app in maintenance mode (stop writes to source). # b. Wait until lag heartbeat shows 0 bytes. # c. Ctrl+C the pg_dbmigrator process — it will sync sequences, drop # the subscription, and clean up the slot/publication on the source. # d. Update DNS / connection string to point at TARGET. # e. Bring app out of maintenance.
# 5. Cleanup on the source — by default pg_dbmigrator drops the slot and # the auto-created publication itself. Only run these if you used # --keep-slot / --no-auto-create-publication, or aborted the run: psql "$SOURCE" -c "SELECT pg_drop_replication_slot('pg_dbmigrator_slot');" psql "$SOURCE" -c "DROP PUBLICATION pg_dbmigrator_pub;"
Total user-visible downtime is steps 4a–4e, which is typically tens of seconds.
Operational Gotchas
A few things that bite people the first time:
Replication slots hold WAL. If you start an online migration and abandon it, the slot will keep the source’s WAL pinned indefinitely, eventually filling the source’s disk. A clean Ctrl+C drops the slot for you, but if the process is killed or crashes, drop the slot manually (pg_drop_replication_slot).
Sequences are synced automatically at cutover. pg_dbmigrator runs setval() on every sequence in the included schemas as part of cutover, so you don’t need the old “advance every sequence by hand” ritual. Per-sequence failures (typically a missing privilege on the target role) are logged as warnings but won’t abort cutover. If your target role can’t setval, pass --no-sequence-sync and run the SQL yourself:
1 2
SELECT setval('public.users_id_seq', (SELECTmax(id) FROM public.users));
DDL during migration is not replicated. If someone runs an ALTER TABLE on the source mid-stream, the target won’t see it and apply will eventually fail when a row references the new column. Freeze schema changes for the duration of the migration. If a DDL change really must happen, you’ll need to refresh the publication and restart the migration.
Restore errors on managed targets. Azure reserves extension names; pg_cron is unavailable on most managed services; some superuser-only objects can’t be restored by an unprivileged role. --allow-restore-errors lets the migration proceed, but inspect the warnings — anything important needs to be applied manually.
Custom column transforms aren’t supported. The streaming apply binds replicated values as text and casts them server-side. If you need to transform data during migration (e.g. re-encrypt a column), do it before or after, not inline.
Major-version differences. If source is PG14 and target is PG16, run pg_dump/pg_restore from the higher version’s binaries. pg_dbmigrator inherits whatever’s on the PATH.
When to Pick Offline vs. Online
Situation
Mode
Database is small (< few GB) and you have a maintenance window
Offline
Dev / staging clones
Offline
Production database, can’t take more than a few seconds of write downtime
Online
Cross-cloud or cross-region migrations
Online
Major-version upgrade on a live system
Online
Source can’t be set to wal_level = logical
Offline (no choice)
Summary
pg_dbmigrator wraps a careful, correct online migration recipe — slot-before-dump, snapshot-consistent copy, streaming apply, operator-driven cutover — into a single Rust CLI. For straightforward jobs the offline mode is enough; for production cutovers where downtime matters, the online mode reduces the outage to the moment you press Ctrl+C.
The most important habits when operating it:
Always confirm wal_level = logical on the source before starting.
Watch the lag heartbeats and only cut over from a CaughtUp state with 0 bytes lag and writes stopped — the threshold is advisory, not automatic.
Let the tool exit cleanly via Ctrl+C so it can drop the slot, the auto-created publication, and sync sequences for you. If the process dies hard, drop the slot manually so abandoned WAL doesn’t fill the source’s disk.
Freeze schema changes for the duration of the migration — DDL isn’t replicated.
]]>
https://isdaniel.github.io/pg-migrator-online-postgresql-migration/2026-05-03T16:00:00.000ZA hands-on guide to pg_dbmigrator, a Rust CLI for migrating PostgreSQL databases — covering offline dump/restore and the online logical-replication mode for near-zero-downtime cutovers.pg_dbmigrator: Near-Zero-Downtime PostgreSQL Migration with Online Mode2026-07-31T03:57:00.860ZDaniel Shihpg_pidstat: Real-Time Per-Backend CPU, Memory, and I/O Monitoring for PostgreSQL
When a PostgreSQL server slows down, the first question is usually: which backend is consuming resources?pg_stat_activity tells you what each backend is doing, but not how much CPU, memory, or disk I/O it uses. You end up jumping between top, pidstat, and pg_stat_activity, manually correlating PIDs.
pg_pidstat solves this by embedding OS-level process metrics directly into PostgreSQL. A single SQL view gives you per-backend CPU percentage, memory consumption, I/O throughput, and context switch rates — all joined with the connection context you already know from pg_stat_activity.
The Problem: Blind Spots in PostgreSQL Monitoring
PostgreSQL’s built-in statistics views (pg_stat_activity, pg_stat_user_tables, pg_stat_io) provide query-level and table-level insights, but they lack process-level OS metrics. When you need to answer questions like:
Which backend is burning 100% CPU?
Is that long-running query memory-hungry or I/O-bound?
Are context switches causing latency spikes?
You typically resort to external tools — pidstat, htop, or custom /proc scrapers — and then manually join their output with pg_stat_activity by PID. This workflow is tedious, error-prone, and impossible to automate in pure SQL.
pg_pidstat eliminates that gap entirely.
Key Features
Per-backend CPU usage as a percentage of total system capacity
Memory tracking — both percentage and absolute MB (resident set size)
I/O throughput — read/write bytes per second and IOPS
I/O wait detection — flags backends blocked on disk
Context switch rates — voluntary and non-voluntary, per second
Full pg_stat_activity integration — all standard columns (pid, datname, usename, state, query, etc.) included
Background worker sampling — metrics updated every 1 second automatically
Lock-free reads — minimal contention with brief exclusive writes only during sampling
Architecture
pg_pidstat is built with pgrx (Rust) and consists of four modules:
A background worker wakes every second and iterates over all PostgreSQL backend PIDs.
For each PID, it reads /proc/[pid]/stat, /proc/[pid]/statm, /proc/[pid]/io, and /proc/[pid]/status to collect raw CPU ticks, memory pages, I/O byte counters, and context switch counts.
The raw readings are stored in a double-buffered shared memory region. The double-buffer design lets SQL queries read the previous-second snapshot without blocking the worker’s current write.
When you query the pg_pidstat view, the activity module computes per-second deltas (rates) from the raw counters and joins them with pg_stat_activity columns.
This design ensures zero lock contention on reads — the only exclusive lock is a brief window when the background worker swaps the active buffer.
Metrics Reference
The pg_pidstat view includes all standard pg_stat_activity columns plus these monitoring columns:
SELECT pid, usename, state, query, io_read_bytes_per_sec, io_write_bytes_per_sec, io_read_ops_per_sec, io_write_ops_per_sec, io_wait FROM pg_pidstat WHERE state ='active' ORDERBY io_read_bytes_per_sec + io_write_bytes_per_sec DESC;
Detect Context Switch Hotspots
High non-voluntary context switches indicate CPU contention — too many backends fighting for CPU time:
1 2 3 4 5 6
SELECT pid, usename, query, voluntary_ctxt_switches_per_sec, nonvoluntary_ctxt_switches_per_sec FROM pg_pidstat WHERE state ='active' ORDERBY nonvoluntary_ctxt_switches_per_sec DESC;
Full Troubleshooting Dashboard
Combine all metrics for a comprehensive view of backend resource usage:
1
2
3
4
5
6
7
8
9
10
11
12
SELECT pid, datname, usename, state, left(query, 80) AS query_preview, round(cpu_percent::numeric, 2) AS cpu_pct, round(memory_usage_mb::numeric, 1) AS mem_mb, round((io_read_bytes_per_sec /1024/1024)::numeric, 2) AS read_mb_s, round((io_write_bytes_per_sec /1024/1024)::numeric, 2) AS write_mb_s, io_wait, round(voluntary_ctxt_switches_per_sec::numeric, 0) AS vol_cs, round(nonvoluntary_ctxt_switches_per_sec::numeric, 0) AS nvol_cs FROM pg_pidstat WHERE state ='active' ORDERBY cpu_percent DESC;
Monitoring Over Time with pg_cron
Pair pg_pidstat with pg_cron to build a historical resource usage table:
-- Sample every 10 seconds via pg_cron SELECT cron.schedule('backend-metrics', '10 seconds', $$ INSERT INTO backend_metrics_history (pid, datname, usename, state, cpu_percent, memory_usage_mb, io_read_bytes_per_sec, io_write_bytes_per_sec) SELECT pid, datname, usename, state, cpu_percent, memory_usage_mb, io_read_bytes_per_sec, io_write_bytes_per_sec FROM pg_pidstat WHERE state ='active'; $$);
Why pg_pidstat Over External Monitoring?
Aspect
External tools (pidstat, top)
pg_pidstat
PID-to-query mapping
Manual correlation
Automatic (joined with pg_stat_activity)
Query interface
Shell parsing / custom scripts
Standard SQL
Alerting integration
Requires glue code
Use any SQL-based alerting
Historical storage
External time-series DB
INSERT INTO ... SELECT from the view
Granularity
Per-process only
Per-backend with database context
Deployment
Agent on every host
PostgreSQL extension — no extra process
The key advantage is context: knowing that PID 12345 uses 90% CPU is useful, but knowing it’s the analytics user running a sequential scan on the orders table in the production database is actionable.
Performance Design
pg_pidstat is designed for minimal overhead in production:
Release-mode optimization: opt-level = 3, fat LTO, single codegen unit
Lock-free reads: Double-buffered shared memory means SELECT from the view never blocks
Brief exclusive writes: Only during the buffer swap (microseconds)
Bounded memory: Fixed-size shared memory for up to 1024 backends
1-second sampling: Background worker reads /proc once per second — negligible system load
Conclusion
pg_pidstat brings OS-level process monitoring into PostgreSQL itself. Instead of correlating PIDs across top, pidstat, and pg_stat_activity, you get CPU, memory, I/O, and context switch metrics in a single SQL view — with full connection context attached.
For anyone running PostgreSQL on Linux and needing to quickly identify resource-heavy backends, pg_pidstat turns a multi-tool investigation into one query.
]]>
https://isdaniel.github.io/pg-pidstat-real-time-postgresql-backend-monitoring/2026-04-27T02:00:00.000Zpg_pidstat is a Rust-based PostgreSQL extension that adds real-time per-backend CPU, memory, I/O, and context switch monitoring via a single SQL view.pg_pidstat: Real-Time Per-Backend CPU, Memory, and I/O Monitoring for PostgreSQL2026-07-31T03:57:00.860ZDaniel Shihpg-walstream: High-Performance PostgreSQL WAL Streaming in Rust
pg-walstream is a Rust library for parsing and streaming PostgreSQL Write-Ahead Log (WAL) messages through logical and physical replication protocols. It provides a type-safe, async-first interface for building real-time Change Data Capture (CDC) pipelines.
If you need to react to database changes in real-time — event-driven architectures, data pipelines, audit logging, cache invalidation, or search index syncing — pg-walstream abstracts the complex PostgreSQL replication protocol into a clean Rust API.
Before diving into pg-walstream, it helps to understand how PostgreSQL replication works at a fundamental level.
What is WAL (Write-Ahead Logging)?
WAL is PostgreSQL’s mechanism for ensuring data durability. The core idea: write the transaction log first, then write the actual data. Every INSERT, UPDATE, DELETE, and DDL change is recorded sequentially in WAL files before the corresponding data pages are flushed to disk.
This design provides two key benefits:
Crash recovery — if the system crashes, PostgreSQL can replay (REDO) the WAL to recover committed transactions that weren’t yet flushed to disk.
I/O efficiency — sequential WAL writes are much faster than random page writes, so PostgreSQL doesn’t need to flush dirty pages on every commit.
Each WAL record is identified by a Log Sequence Number (LSN) — a monotonically increasing pointer into the WAL stream. LSN is the backbone of replication: it tells both the sender and receiver exactly where they are in the change history.
PostgreSQL supports two replication modes, each serving different use cases:
Physical Replication streams raw WAL bytes — the exact disk-level changes — to a standby server. The standby replays these byte-for-byte, producing an identical copy of the primary. This is what powers read replicas and high-availability setups.
Logical Replication decodes WAL into higher-level change events (INSERT, UPDATE, DELETE) using an output plugin (e.g., pgoutput). Instead of raw disk blocks, consumers receive structured messages like “row X was inserted into table Y with these column values.” This is what powers CDC pipelines.
pg-walstream supports both modes — physical replication for standby/backup scenarios and logical replication for CDC.
The Logical Replication Protocol
When a client connects to PostgreSQL in replication mode, they communicate via the Streaming Replication Protocol. For logical replication, the flow works as follows:
Client creates a replication slot — this tells PostgreSQL to retain WAL segments needed by this consumer, preventing them from being recycled.
Client starts replication from a slot, specifying the output plugin (pgoutput) and which publication to subscribe to.
PostgreSQL streams messages — the server continuously sends WAL data messages (XLogData) containing decoded change events.
Client sends feedback — periodically, the client reports its progress (flushed LSN, applied LSN) back to the server. This lets PostgreSQL know which WAL segments can be safely recycled.
The decoded messages follow the logical replication message format, which has evolved across four protocol versions:
Parallel streaming, abort_lsn field for more precise abort handling
Each message type carries specific data. For example, an INSERT message contains:
Relation ID — which table the row belongs to
Tuple data — the column values of the new row, typed by OID
The RELATION message (sent once per table, or when a schema changes) maps the relation ID to a table name, namespace, and column definitions — so the consumer can interpret the tuple data.
Why Build a Library for This?
Implementing the replication protocol from scratch involves:
Managing the PostgreSQL wire protocol and authentication (cleartext, MD5, SCRAM-SHA-256)
Parsing binary WAL messages with protocol-version-specific formats
Tracking LSN positions and sending periodic feedback to avoid WAL bloat
Handling connection drops, retries, and replication slot lifecycle
Dealing with streaming transactions that may arrive interleaved
pg-walstream encapsulates all of this complexity into a type-safe Rust API, so you can focus on what to do with the change events rather than how to receive them.
Key Features
Protocol v1–v4 support including streaming transactions (v2), two-phase commit (v3), and parallel streaming (v4)
Two connection backends: libpq (C FFI, default) and rustls-tls (pure Rust, no runtime C deps)
Zero-copy buffers via the bytes crate — no unnecessary data cloning
Serde-based deserialization — map WAL events directly to Rust structs
Automatic retry with exponential backoff for transient failures
Async/await with tokio and futures::Stream integration
Memory efficient — all configurations stay under 18 MB RSS
Best data throughput: 57.1 MB/s (PG18 + COPY, Payload-2KB scenario).
Stress Scaling: 16 to 192 Concurrent Writers
Writers
PG16
PG18 Binary+DirectTLS
PG18 +COPY
16
125,657
130,625
185,044
32
111,970
133,880
184,718
64
103,937
125,082
182,349
128
87,352
109,594
160,293
192
71,316
98,482
171,585
Under high concurrency (16 to 192 writers), PG16 degrades by 43% while PG18 + COPY only degrades by ~7%, demonstrating significantly better scalability.
CPU Efficiency (events/sec per 1% CPU)
Scenario
PG16
PG18 Binary+DirectTLS
PG18 +COPY
Baseline
5,689
5,637
5,920
Batch-5000
5,379
5,733
5,440
Wide-20col
2,369
5,059
5,517
Batch-100
3,966
5,572
5,693
PG18 variants deliver consistently higher CPU efficiency, averaging 5,200+ events/sec per 1% CPU compared to PG16’s ~4,700.
Memory Usage
All configurations remain extremely lightweight — between 15–18 MB RSS regardless of load. Memory stays flat even under 192 concurrent writers, demonstrating the zero-copy buffer design pays off.
Key Takeaways from Load Tests
PG18 + COPY + binary mode is the clear winner, peaking at 209K events/sec
Stress resilience — PG18 + COPY maintains throughput under heavy concurrency where PG16 degrades sharply
CPU efficient — the rustls-tls backend uses ~3x less CPU than libpq in prior benchmarks (4,252 vs 1,628 events/sec per 1% CPU)
Memory stable — sub-18 MB footprint under all tested conditions
Binary mode + direct TLS provide significant improvements even without COPY optimization
Performance Design Decisions
Several design choices contribute to pg-walstream’s performance:
SmallVec for tuple data — up to 16 columns stored inline on the stack, avoiding heap allocation for common cases
Custom OidHasher — eliminates SipHash overhead for 32-bit OID integer keys
Arc<str> for column/namespace names — shared immutable strings across events
CachePadded atomics for LSN feedback — avoids false sharing in concurrent scenarios
Feedback throttling — time checks only every 128 events via bitmask (count & 0x7F == 0)
TCP Tuning for Production
For high-throughput deployments, the following Linux kernel parameters are recommended:
pg-walstream fills a gap in the Rust ecosystem for a production-grade PostgreSQL WAL streaming library. With protocol v1–v4 support, dual connection backends, zero-copy parsing, and throughput exceeding 200K events/sec, it provides a solid foundation for building CDC pipelines, event-driven systems, and real-time data synchronization.
The load testing results demonstrate that pairing pg-walstream with PostgreSQL 18’s binary mode and COPY optimization delivers exceptional performance and scalability — maintaining high throughput even under 192 concurrent writers while keeping memory usage under 18 MB.
]]>
https://isdaniel.github.io/pg-walstream-rust-postgresql-wal-streaming/2026-04-21T14:00:00.000ZA high-performance Rust library for parsing and streaming PostgreSQL WAL messages via logical replication — with load testing results showing 200K+ events/sec.pg-walstream: High-Performance PostgreSQL WAL Streaming in Rust2026-07-31T03:57:00.861ZDaniel ShihWhat is pg2any?
pg2any is a Rust library (published as pg2any_lib on crates.io) that builds production-ready Change Data Capture (CDC) pipelines. It reads PostgreSQL’s Write-Ahead Log (WAL) through logical replication and replays changes — inserts, updates, deletes, and truncates — to destination databases in real time.
Supported destinations:
MySQL (via SQLx)
SQL Server (via Tiberius)
SQLite (via SQLx)
Each destination is behind a Cargo feature flag (mysql, sqlserver, sqlite), so you compile only the drivers you need.
A ready-to-run example application lives at pg2any-example, and the underlying PostgreSQL streaming replication protocol is handled by the companion crate pg_walstream.
Architecture
pg2any follows a producer–consumer pattern with file-based transaction persistence as the intermediary. This design gives crash safety: if the process dies mid-stream, committed-but-unexecuted transactions survive on disk and are replayed on restart.
Transactions flow through three directories during their lifetime:
Directory
Purpose
sql_data_tx/
Stores actual SQL content. Files are append-only and rotate at 64 MB segments for large transactions.
sql_received_tx/
Metadata for in-progress transactions (created at BEGIN).
sql_pending_tx/
Metadata for committed transactions ready for the consumer (atomically moved from sql_received_tx/ on COMMIT).
This three-phase approach means that only fully committed transactions ever reach the consumer, and incomplete transactions are cleaned up on restart.
Producer
The producer reads the logical replication stream event by event:
On BEGIN — creates a metadata file in sql_received_tx/ and a data file in sql_data_tx/.
On INSERT / UPDATE / DELETE / TRUNCATE — converts each event to destination-dialect SQL and appends it to the data file via a BufferedEventWriter.
On COMMIT — atomically moves metadata from sql_received_tx/ to sql_pending_tx/, making the transaction visible to the consumer.
For protocol version 2+, the producer also handles streaming transactions (StreamStart / StreamStop / StreamCommit), which allow PostgreSQL to send chunks of large in-progress transactions before the final commit.
Consumer
The consumer maintains a priority queue ordered by commit LSN to guarantee correct replay order:
Reads pending transaction metadata from sql_pending_tx/.
Parses SQL from sql_data_tx/ using a streaming SQL parser (constant memory regardless of transaction size).
Executes statements atomically in a destination-side database transaction.
Invokes a PreCommitHook — a callback that runs inside the destination transaction before COMMIT, used to atomically persist the LSN checkpoint alongside the data. This eliminates the window where data is committed but the checkpoint is not (or vice versa).
Commits, then deletes processed files.
Crash Recovery
On startup, pg2any scans:
sql_received_tx/ for incomplete transactions → aborts them.
sql_pending_tx/ for committed-but-unexecuted transactions → replays them.
The LsnTracker persists the last successfully applied LSN, so replication resumes exactly where it left off.
Key Features
DML Coalescing
One of pg2any’s most impactful optimizations. Instead of executing individual DML statements one by one, the coalescing engine merges consecutive same-table operations:
Multiple DELETEs → combined WHERE clauses with OR.
This is applied across all three destination types, with dialect-aware identifier quoting (backticks for MySQL, brackets for SQL Server, double quotes for SQLite) and respects max_allowed_packet limits (MySQL) with an 80% safety margin.
Compressed Storage
When enabled via PG2ANY_ENABLE_COMPRESSION=true, transaction files are stored as .sql.gz with accompanying .sql.gz.idx index files. Sync points are created every 1,000 statements, enabling O(1) seeking to arbitrary positions without decompressing the entire file — critical for efficient crash recovery of large transactions.
Monitoring
With the metrics feature enabled, pg2any exposes a Prometheus-compatible HTTP server (default port 8080):
GET /metrics — Prometheus text format with event counters, LSN progress, processing rates, error counts, and transaction statistics.
GET /health — JSON health status.
Metrics use AtomicU64 counters (lock-free) to minimize overhead on the hot path. When compiled without the metrics feature, all metric calls become zero-cost no-ops.
Adds streaming transactions for large in-progress transactions
v3
Adds two-phase commit support
v4
Additional protocol capabilities
Quick Start
Prerequisites
PostgreSQL 10+ with wal_level = logical
A destination database (MySQL 8.0+, SQL Server, or SQLite)
PostgreSQL Setup
1 2 3 4 5 6 7 8 9
-- Verify logical replication is enabled SHOW wal_level; -- must be 'logical' SHOW max_replication_slots; SHOW max_wal_senders;
-- Create a publication for the tables you want to replicate CREATE PUBLICATION cdc_pub FORALL TABLES; -- Or for specific tables: -- CREATE PUBLICATION cdc_pub FOR TABLE orders, customers;
Using pg2any as a Library
Add pg2any_lib to your Cargo.toml with the destination features you need:
1 2 3
[dependencies] pg2any_lib = { version = "0.9", features = ["mysql", "metrics"] } tokio = { version = "1", features = ["full"] }
The example project includes a full Docker Compose stack with PostgreSQL, MySQL, the CDC application, and Prometheus:
1 2 3 4 5 6 7 8
git clone https://github.com/isdaniel/rust_playground.git cd rust_playground/pg2any-example
# Start all services docker-compose up -d
# Watch CDC logs docker-compose logs -f cdc_app
Design Decisions Worth Noting
File-based persistence over in-memory queues — Using the filesystem as the intermediary between producer and consumer trades some latency for crash safety. If the process is killed, no committed transaction data is lost.
PreCommitHook for atomic checkpoints — Executing the LSN checkpoint update inside the same destination transaction as the data changes eliminates an entire class of consistency bugs where the checkpoint and data can diverge.
Feature-gated compilation — Database drivers and monitoring are behind Cargo features, so the binary only includes what you actually use. This reduces compile time, binary size, and attack surface.
Transaction segmentation at 64 MB — Large transactions (e.g., bulk imports) are split across multiple files to prevent unbounded memory and disk usage.
Testing
pg2any has 104+ tests across 16 test files, covering:
Integration tests for all three destination types
Streaming transaction correctness
Compression and large file handling
WHERE clause generation for UPDATE/DELETE with various replica identity configurations
Position tracking for crash recovery
Metrics logic
Beyond unit and integration tests, the project runs chaos testing in CI — randomly restarting the CDC application during pgbench workloads to validate graceful shutdown and recovery under real conditions.
]]>
https://isdaniel.github.io/pg2any-rust-introduce/2025-09-09T13:10:43.000Zpg2any is a Rust CDC library that streams PostgreSQL changes via logical replication to MySQL, SQL Server, or SQLite with crash-safe persistencepg2any: A Rust CDC Library for Streaming PostgreSQL Changes to Any Database2026-07-31T03:57:00.861ZDaniel Shih
大家好,今天要和大家介紹我近期開發的一個開源專案 —— redis_fdw_rs,這是一個使用 Rust 語言與 pgrx 框架實作的 Redis Foreign Data Wrapper (FDW),讓你能夠在 PostgreSQL 中直接查詢 Redis 資料,就像操作一般的資料表一樣。
-- 建立 Redis 伺服器連線 CREATE SERVER redis_server FOREIGN DATA WRAPPER redis_wrapper OPTIONS (host_port '127.0.0.1:6379');
-- 宣告一個 Redis hash 的外部表格 CREATEFOREIGNTABLE user_profiles ( field text, value text ) SERVER redis_server OPTIONS (table_type 'hash', table_key_prefix 'user:profiles');
-- 開始使用 SQL 操作 Redis! INSERT INTO user_profiles VALUES ('name', 'John'); SELECT*FROM user_profiles WHERE field ='email';
redis_fdw_rs=# INSERT INTO user_profiles (key, value) SELECT i, 'value_'|| i FROM generate_series(1,100000) i; INSERT0100000 Time: 12911.183 ms (00:12.911) redis_fdw_rs=# SELECT*FROM user_profiles where key ='5'; key |value -----+--------- 5| value_5 (1row)
Time: 15.380 ms redis_fdw_rs=# SELECT*FROM user_profiles where key in ('10', '15', '20'); key |value -----+---------- 10| value_10 15| value_15 20| value_20 (3rows)
-- 建 replication user CREATE ROLE replicator WITH REPLICATION LOGIN PASSWORD 'replicator_pw'; -- 建 publication(只複寫特定 table 或使用 FOR ALL TABLES) CREATE PUBLICATION my_publication FORTABLE public.my_table;
# 執行(參數順序為 key value key value ...) ./target/release/pg_replica_rs user azureuser **replication database** host 127.0.0.1 dbname redis_fdw_rs port 5432
INSERT INTO public.my_table (msg) VALUES ('hello replication'); UPDATE public.my_table SET msg ='altered'WHERE id =1; DELETEFROM public.my_table WHERE id =1;
觀察 replication_checker_rs 的輸出(示例)
1 2 3 4 5 6 7 8 9 10 11 12 13 14
025-08-10T02:57:54.417412Z INFO Started receiving data from database server 2025-08-10T02:58:01.488499Z INFO BEGIN: Xid 1522 2025-08-10T02:58:01.489158Z INFO Received relation info for public.t1 2025-08-10T02:58:01.489235Z INFO TRUNCATE 2025-08-10T02:58:01.489255Z INFO public.t1 2025-08-10T02:58:01.489318Z INFO COMMIT: flags: 0, lsn: 43614824, end_lsn: 43614944, commit_time: 2025-08-1002:58:01.484 UTC 2025-08-10T02:58:07.583760Z INFO BEGIN: Xid 1523 2025-08-10T02:58:07.583925Z INFO Received relation info for public.t1 2025-08-10T02:58:07.584000Z INFO table public.t1: INSERT: 2025-08-10T02:58:07.584012Z INFO a: 1 2025-08-10T02:58:07.584040Z INFO table public.t1: INSERT: 2025-08-10T02:58:07.584062Z INFO a: 2 2025-08-10T02:58:07.584104Z INFO COMMIT: flags: 0, lsn: 43615128, end_lsn: 43615176, commit_time: 2025-08-1002:58:07.580 UTC
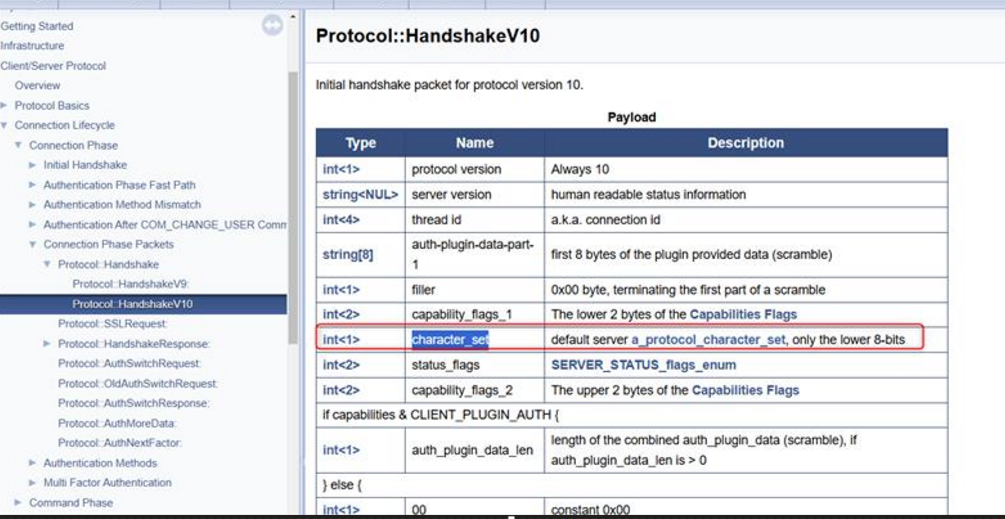
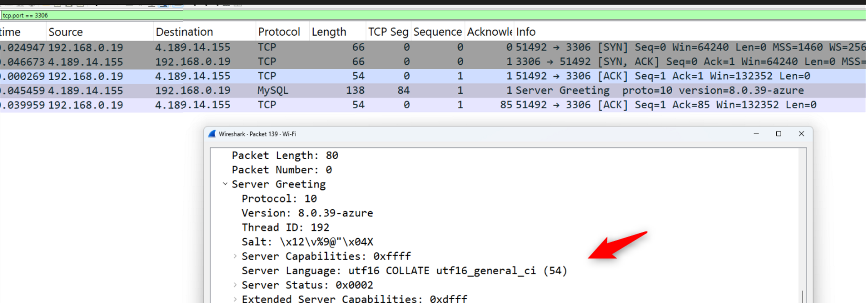
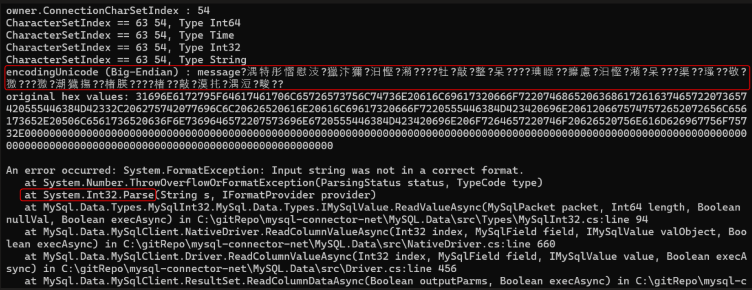
在近期處理一個與 MySQL 字元集相關的問題時,我深入研究了 MySQL Server 的 Handshake 機制以及 mysql-connector-net 原始碼,發現了一個容易被忽略但可能會造成重大錯誤的細節——即使 character_set_server 是動態參數,但實際上修改後仍需要重啟 MySQL Server,否則會造成驅動端的解碼錯誤。
問題背景:為什麼驅動程式仍使用舊的字元集?
根據 MySQL Server 的設計,當 client 端連線時,Server 會在 Handshake Initial Packet 中回傳一些基本資訊,其中就包括伺服器的預設字元集(character_set_server)。這段資訊是透過以下的程式碼取得:
]]>
https://isdaniel.github.io/mysql-connector-net-charset-issue/2025-07-09T15:10:43.000Z深入分析 MySQL character_set_server 修改後為何需要重啟:從 mysql-connector-net 原始碼與 MySQL Handshake 機制解析字元集設定的陷阱,避免驅動端解碼錯誤為什麼修改 MySQL 的 character_set_server 後仍需重啟?從 mysql-connector-net 探討字元集的陷阱2026-07-31T03:57:00.860ZDaniel Shih
Here’s a well-structured draft for your technical blog post based on the provided Rust + pgrx Foreign Data Wrapper (FDW) code.
🚀 Building a Simple PostgreSQL FDW with Rust and pgrx
PostgreSQL Foreign Data Wrappers (FDW) enable PostgreSQL to query external data sources as if they were regular tables. Traditionally, FDWs are written in C, but with pgrx, we can now build PostgreSQL extensions — including FDWs — in Rust, unlocking safety and modern tooling.
In this post, we’ll walk through creating a simple FDW using Rust and pgrx that simulates reading rows from an external source (e.g., Redis or API). While it’s a stub, it demonstrates how to implement the core FDW lifecycle.
🛠️ What Can You Build with pgrx?
✅ SQL Functions: Scalar, aggregate, and set-returning functions.
✅ Custom Types: Define composite types or enums in Rust.
✅ Foreign Data Wrappers (FDWs): Like the one in your example — connect PostgreSQL to external systems (Redis, APIs, file systems, etc.).
✅ Index Access Methods: Implement new index types.
✅ Background Workers: Run tasks in the background inside PostgreSQL.
✅ Hooks: Intercept or modify PostgreSQL internal behavior (like planner or executor hooks).
🌐 Under the hood:
PostgreSQL communicates via C APIs.
pgrx provides Rust-safe bindings to these APIs.
Memory management is handled carefully via PgMemoryContexts, matching PostgreSQL’s memory context model.
Rust functions are exposed to PostgreSQL as SQL-callable functions with the #[pg_extern] macro.
🏗️ Key Components of an default_fdw
PostgreSQL FDWs consist of several callback functions that handle different phases of query planning and execution:
This post walked you through the basics of building a PostgreSQL FDW using Rust and pgrx. While this example generates dummy data, the same structure can be extended to connect with real-world systems like Redis, REST APIs, or message queues.
🚀 Next Steps
Add connection logic to Redis or any backend.
Support INSERT, UPDATE, DELETE by implementing the modification callbacks.
]]>
https://isdaniel.github.io/rust-pgrx-extension-fdw/2025-06-30T14:30:11.000ZLearn how to build a PostgreSQL Foreign Data Wrapper (FDW) in Rust using pgrx — query external data sources as regular PostgreSQL tablesBuilding a PostgreSQL Foreign Data Wrapper (FDW) in Rust with pgrx2026-07-31T03:57:00.864ZDaniel Shih什麼是 MCP?
MCP(Model Context Protocol)是一種協定,用於在工具之間進行通訊與協作。透過 MCP,可以讓各種獨立的工具(如模型、插件、服務)以一致的格式互相交換資料與指令。MCP Server 是提供特定功能的伺服器端程式,能與支援 MCP 的前端進行互動。
Weather MCP Server 是什麼?
Weather MCP Server 是一個基於 MCP 協定開發的天氣資訊伺服器,利用 Open-Meteo API 提供免費的天氣資料。透過這個伺服器,你可以查詢:
]]>
https://isdaniel.github.io/mcp-server-weather/2025-06-22T12:42:00.000Z以 Weather MCP Server 為例,介紹 Model Context Protocol (MCP) 協定如何讓 AI 模型、插件與服務以統一格式交換資料與指令,從零建立一個 MCP Server使用 Model Context Protocol 以 Weather MCP Server 為例2026-07-31T03:57:00.859ZDaniel Shih簡介
A Docker-like container runtime written in Rust with daemon architecture, supporting multi-container orchestration, persistent state management, and comprehensive CLI commands.
Overview
RustBox is a container runtime that isn’t competing with (Docker or Kubernetes), we return to the core and build a simplest “Sandbox/isolated runtime environment” from the lowest level Linux kernel mechanisms (namespaces, cgroups, OverlayFS, etc.), provides Docker-like functionality using:
Daemon Architecture with Unix domain socket communication
Multi-container Management with persistent state
OverlayFS for isolated container filesystems
Cgroups v2 for resource limits (memory, CPU)
Linux namespaces for complete process isolation
Comprehensive CLI with run, stop, list, inspect, remove, logs, and attach commands
This tool is designed for container orchestration, testing environments, and secure code execution.
─────────────────────────────────────────────────────────────── Summary: - PTY Master: controlled by the daemon, mediates all I/O - PTY Slave : presented to the container process as its terminal - Unix Socket: transports attach stream between client ↔ daemon ───────────────────────────────────────────────────────────────
Container Isolation
RustBox employs a double fork pattern for each container to ensure proper isolation:
Process Hierarchy (Per Container)
1 2 3 4 5 6 7 8 9 10 11 12 13 14 15 16 17 18 19
[Daemon Process] └─> spawn_blocking() └─> [Container Task] └─> fork() #1 ├─> [Namespaced Parent Process] │ ├─> unshare() - Creates new namespaces │ ├─> setup cgroups and overlay │ └─> fork() #2 │ ├─> [Inner Child Process] │ │ ├─> Mount /proc and /dev │ │ ├─> chroot() to merged overlay │ │ ├─> chdir() to working directory │ │ └─> execv() - Execute command │ └─> [Namespaced Parent] waits for inner child │ └─> Unmounts /proc and /dev inside namespace └─> [Container Task] waits for namespaced parent ├─> Unmounts overlay filesystem ├─> Cleans up cgroups └─> Updates container state in registry
Container Lifecycle States
1 2 3
Created ──(start)──> Running ──(exit)──────> Exited │ └──(stop)──> Stopped ──(exit)──> Exited
Memory: Supports units like 100M, 1G, 512000 (bytes)
CPU: Fraction of one core, e.g., 0.5 for 50% CPU limit
Enforced via cgroups v2 at /sys/fs/cgroup/rustbox/<container-id>/
Security Model
Daemon runs as root for privileged operations
Client commands run as user, connect via Unix socket
Containers run in isolated namespaces (PID, NET, UTS, IPC, USER)
Input validation prevents directory traversal and injection attack
Final Thoughts
RustBox is not a full container system, and that’s by design — it’s transparent, hackable, and educational. Whether you’re looking to secure untrusted code, explore low-level Linux features, or just love writing systems code in Rust, RustBox is a fantastic playground.
]]>
https://isdaniel.github.io/rustbox-introduce/2025-06-01T15:30:11.000ZRustBox 是用 Rust 打造的類 Docker 容器 runtime,基於 Linux namespaces、cgroups、OverlayFS,支援多容器編排與完整 CLIRustBox - Docker-Lite Sandbox for Hackers and Learners2026-07-31T03:57:00.864ZDaniel Shihintroduce
If you’ve ever struggled to instrument legacy apps or non-standard services for observability, OpenTelemetry_SideCar is here to help. This project offers a non-intrusive way to export metrics and traces via OpenTelemetry using a sidecar approach — no SDK required in your main app.
OpenTelemetry_SideCar is a standalone proxy service that collects metrics and traces outside of your application and forwards them to a telemetry backend (e.g., Prometheus, Jaeger, or Azure Monitor).
💡 Why a Sidecar?
In cloud-native systems, a sidecar is a helper container or process that runs alongside your main application. It can observe, extend, or enhance app behavior without changing application code. This pattern is ideal for adding observability when:
You can’t modify the original code (e.g., closed-source, legacy binaries).
You want to centralize telemetry logic.
You’re aiming for a unified instrumentation strategy.
🧠 Key Concepts
📊 OpenTelemetry
OpenTelemetry is the CNCF-backed observability framework offering a vendor-neutral standard to collect metrics, logs, and traces.
This project leverages:
OTLP (OpenTelemetry Protocol) for data transport
Push-based metrics collection via HTTP endpoints
Custom trace generation from event messages
🧱 Sidecar Design Pattern
This service runs in parallel with your main app and exposes lightweight endpoints for:
Sending metrics via /metrics
Sending traces via /trace
Apps interact with the sidecar using simple HTTP POST requests.
⚙️ How It Works
Architecture
The project consists of the following components:
.NET Web Application: A simple web service with custom metrics and tracing- OpenTelemetry Collector: Receives telemetry data and exports it to backends
Prometheus: Time-series database for storing and querying metrics- Jaeger: Distributed tracing system for monitoring and troubleshooting
No traces in Jaeger: - Verify Jaeger is running: docker-compose ps jaeger
Check that OTLP is enabled in Jaeger - Generate some traces by accessing the application endpoints
Application errors:
Check application logs: docker-compose logs app
Development
Local Development
To run the application locally:
Navigate to the src directory2. Run dotnet run Note: When running locally, you’ll need to update the OTLP endpoint in Program.cs to point to your local OpenTelemetry Collector.
Adding Custom Metrics
Create a new meter:
1
var myMeter = new Meter("MyApp.Metrics", "1.0.0");
Create metrics instruments:
1
var myCounter = myMeter.CreateCounter<int>("my.counter", "Count of operations");
Record measurements:
1
myCounter.Add(1);
Register the meter in the OpenTelemetry configuration:
1
metricsProviderBuilder.AddMeter("MyApp.Metrics");
📥 Example: Sending Metrics
Suppose your app wants to record a counter metric for user logins. All it needs to do is POST to the sidecar:
These control how frequently data is flushed and where it’s sent.
🔒 No SDK, No Problem
One of the biggest benefits of OpenTelemetry_SideCar is that your main app doesn’t need to:
Link or compile with any OpenTelemetry SDK
Maintain exporter or collector logic
Handle telemetry lifecycle
Your app stays clean — just send HTTP!
🚀 Get Started
1 2 3
git clone https://github.com/isdaniel/OpenTelemetry_SideCar.git cd OpenTelemetry_SideCar cargo run
Then, start POSTing traces and metrics from your apps.
🙌 Final Thoughts
OpenTelemetry_SideCar empowers teams to add observability with zero code changes to their applications. It’s perfect for teams looking to modernize telemetry practices without touching production binaries.
If you’re working with mixed environments or maintaining legacy services, give it a try!
]]>
https://isdaniel.github.io/opentelemetry-sidecar/2025-06-01T14:30:11.000ZOpenTelemetry SideCar 是獨立的 sidecar proxy,無需修改程式碼即可匯出 metrics 與 traces,適合監控 legacy 或封閉原始碼應用Instrument Any App Instantly Using OpenTelemetry_SideCar2026-07-31T03:57:00.860ZDaniel ShihAI-Powered PostgreSQL Performance Tuning with MCP - Introducing pgtuner_mcp
Database performance optimization is one of the most critical yet challenging aspects of maintaining production systems. Identifying slow queries, optimizing indexes, and monitoring database health requires deep expertise and constant vigilance. Today, I’m excited to introduce pgtuner_mcp, a Model Context Protocol (MCP) server that brings AI-powered PostgreSQL performance tuning capabilities directly into your development workflow.
What is pgtuner_mcp?
pgtuner_mcp is an intelligent PostgreSQL performance analysis server built on the Model Context Protocol (MCP). It bridges the gap between AI assistants (like Claude) and your PostgreSQL database, enabling natural language interactions for complex database optimization tasks.
-- Create monitoring user CREATEUSER pgtuner_monitor WITH PASSWORD 'secure_password';
-- Grant connection and schema access GRANTCONNECTON DATABASE your_database TO pgtuner_monitor; GRANT USAGE ON SCHEMA public TO pgtuner_monitor;
-- Grant read access to user tables GRANTSELECTONALL TABLES IN SCHEMA public TO pgtuner_monitor; ALTERDEFAULT PRIVILEGES IN SCHEMA public GRANTSELECTON TABLES TO pgtuner_monitor;
-- Grant system statistics access (PostgreSQL 10+) GRANT pg_read_all_stats TO pgtuner_monitor;
-- Grant access to pg_stat_statements GRANTSELECTON pg_stat_statements TO pgtuner_monitor; GRANTSELECTON pg_stat_statements_info TO pgtuner_monitor;
-- For bloat detection (PostgreSQL 14+) GRANT pg_stat_scan_tables TO pgtuner_monitor;
-- For HypoPG functions GRANTSELECTON hypopg_list_indexes TO pgtuner_monitor; GRANTEXECUTEONFUNCTION hypopg_create_index(text) TO pgtuner_monitor; GRANTEXECUTEONFUNCTION hypopg_drop_index(oid) TO pgtuner_monitor; GRANTEXECUTEONFUNCTION hypopg_reset() TO pgtuner_monitor;
Configuration
Server Modes
pgtuner_mcp supports three deployment modes:
1. Standard MCP Mode (stdio)
Best for MCP clients like Claude Desktop or Cline:
User: "Find the slowest queries in my database" AI + pgtuner_mcp: 1. Calls get_slow_queries(limit=10, order_by="total_time") 2. Identifies top 3 problematic queries 3. Calls analyze_query() foreach 4. Detects sequential scans andmissing indexes 5. Calls get_index_recommendations() 6. Provides CREATEINDEX statements with impact estimates
2. Index Optimization
Scenario: Database growing, need to optimize indexes.
Workflow:
1 2 3 4 5 6 7
User: "Help me optimize my database indexes" AI + pgtuner_mcp: 1.Calls find_unused_indexes() to identify cleanup candidates 2. Calls get_index_recommendations() fornew index suggestions 3. Calls explain_with_indexes() to test hypothetical indexes 4. Estimates storage savings and performance improvements 5. Provides prioritized action plan
3. Health Check Before Production Deploy
Scenario: Pre-deployment database health validation.
Workflow:
1 2 3 4 5 6 7 8 9
User: "Is my database ready for production traffic?" AI + pgtuner_mcp: 1. Calls check_database_health(verbose=True) 2. Analyzes connection pool capacity 3. Checks cache hit ratios 4. Reviews vacuum and autovacuum status 5. Analyzes wait events 6. Reviews configuration settings 7. Provides comprehensive health report with recommendations
4. Performance Regression Investigation
Scenario: Performance degraded after recent changes.
Workflow:
1 2 3 4 5 6 7 8
User: "Why is my database slower than last week?" AI + pgtuner_mcp: 1. Calls get_table_stats() to identify growth patterns 2. Calls analyze_disk_io_patterns() for I/O bottlenecks 3. Calls get_bloat_summary() to detect table/index bloat 4. Calls monitor_vacuum_progress() to check maintenance 5. Calls analyze_wait_events() to find resource contention 6. Identifies root causes and provides remediation steps
Performance Considerations
Extension Overhead
Extension
Performance Impact
Recommendation
pg_stat_statements
Low (~1-2%)
Always enable
track_io_timing
Low-Medium (~2-5%)
Enable in production, test first
track_functions = all
Low
Enable for function-heavy workloads
pgstattuple functions
Varies by table size
Use _approx for large tables
HypoPG
Zero (in-memory only)
Safe for all environments
Tip: Use pg_test_timing to measure timing overhead on your specific hardware:
1
SELECT pg_test_timing();
Best Practices
Use Approximate Analysis: For large tables (>5GB), use pgstattuple_approx instead of pgstattuple
Filter System Users: Exclude monitoring/replication users using PGTUNER_EXCLUDE_USERIDS
Limit Query History: Configure pg_stat_statements.max based on your workload
Regular Maintenance: Use vacuum monitoring tools to ensure optimal performance
Test Hypothetical Indexes: Always test with HypoPG before creating real indexes
Conclusion
pgtuner_mcp represents a paradigm shift in database performance optimization. By combining the power of AI assistants with deep PostgreSQL expertise through the Model Context Protocol, it makes advanced database tuning accessible to developers at all skill levels.
The tool doesn’t replace database administrators—it augments their capabilities and democratizes access to expert-level analysis. Whether you’re debugging a slow query, planning index strategies, or conducting pre-deployment health checks, pgtuner_mcp provides intelligent, context-aware assistance.
Key Takeaways
AI-Native Performance Tuning: Natural language interface to complex database operations
Risk-Free Testing: HypoPG enables index testing without disk usage
Whether you’re a seasoned DBA looking to leverage AI for faster workflows or a developer seeking to understand and optimize database performance, pgtuner_mcp offers a powerful, modern approach to PostgreSQL tuning.
]]>
https://isdaniel.github.io/pgtuner-mcp-ai-powered-postgresql-performance/2025-01-13T02:30:00.000Zpgtuner_mcp is an MCP server for AI-driven PostgreSQL performance analysis, tuning advice, and health checks from your development workflowAI-Powered PostgreSQL Performance Tuning with MCP - Introducing pgtuner_mcp2026-07-31T03:57:00.862ZDaniel ShihBuilding Safe PostgreSQL Extensions with Rust - Introducing pg_where_guard
Database safety is a critical concern for any production system. Accidental data loss from DELETE or UPDATE statements without WHERE clauses can be catastrophic. Today, I’ll introduce pg_where_guard, a PostgreSQL extension built with Rust and the pgrx framework that prevents these dangerous operations.
What is pg_where_guard?
pg_where_guard is a PostgreSQL extension that acts as a safety net for your database by intercepting and blocking potentially dangerous SQL operations:
DELETE Protection: Prevents DELETE FROM table without WHERE clause
UPDATE Protection: Prevents UPDATE table SET ... without WHERE clause
CTE Support: Recursively checks Common Table Expressions
Hook Integration: Uses PostgreSQL’s post_parse_analyze_hook for query interception
Memory Safe: Written in Rust with pgrx for safety and performance
Building PostgreSQL extensions traditionally meant working with C and dealing with manual memory management, potential segmentation faults, and complex debugging. Rust changes this paradigm by offering:
Performance
Zero-cost abstractions mean Rust code performs as well as equivalent C code while being much safer.
-- Create a test table CREATE TABLE employees ( id SERIAL PRIMARY KEY, name TEXT NOT NULL, department TEXT, salary INTEGER );
-- Insert test data INSERT INTO employees (name, department, salary) VALUES ('Alice Johnson', 'Engineering', 75000), ('Bob Smith', 'Marketing', 65000), ('Charlie Brown', 'Engineering', 80000);
-- These operations work fine (have WHERE clauses) UPDATE employees SET salary =78000WHERE name ='Alice Johnson'; DELETEFROM employees WHERE department ='Marketing';
Dangerous Operations (Blocked)
1 2 3 4 5 6 7 8 9
-- These commands will FAIL due to pg_where_guard protection:
-- This will fail: UPDATE without WHERE clause UPDATE employees SET salary =100000; -- ERROR: UPDATE requires a WHERE clause
-- This will fail: DELETE without WHERE clause DELETEFROM employees; -- ERROR: DELETE requires a WHERE clause
Common Table Expression Support
The extension also protects CTEs:
1 2 3 4 5 6
-- This would also be blocked WITH department_update AS ( UPDATE employees SET salary = salary *1.1-- No WHERE clause! RETURNING * ) SELECT*FROM department_update;
Performance Considerations
Minimal Overhead
pg_where_guard adds minimal performance overhead because it:
Only analyzes DELETE and UPDATE statements
Performs lightweight checks on the parsed query tree
Uses efficient Rust code with zero-cost abstractions
Operates at parse time, not execution time
Production Readiness
The extension is designed for production use with:
Database Migration Tools: Validate migrations before execution
ORM Frameworks: Add safety checks to generated queries
Monitoring Systems: Alert on attempted dangerous operations
Audit Systems: Log blocked operations for compliance
Conclusion
pg_where_guard demonstrates the power of modern Rust tooling for PostgreSQL extension development. By combining Rust’s safety guarantees with pgrx’s ease of use, we can build robust database tools that protect against common but dangerous operations.
The extension serves as both a practical safety tool and an example of how Rust is revolutionizing systems programming beyond traditional applications. As the PostgreSQL ecosystem continues to evolve, Rust-based extensions like pg_where_guard pave the way for safer, more maintainable database tools.
Key Takeaways
Safety First: Rust eliminates entire classes of bugs that plague C extensions
Developer Productivity: pgrx makes PostgreSQL extension development accessible
Whether you’re looking to protect your database from accidental data loss or explore modern PostgreSQL extension development, pg_where_guard offers a compelling example of what’s possible with Rust and pgrx.
]]>
https://isdaniel.github.io/pg-where-guard-rust-postgresql-extension/2025-01-02T23:20:00.000Zpg_where_guard is a Rust/pgrx PostgreSQL extension that blocks unsafe UPDATE and DELETE without WHERE clauses, preventing accidental data lossBuilding Safe PostgreSQL Extensions with Rust - Introducing pg_where_guard2026-07-31T03:57:00.861ZDaniel ShihForeword
TLS (Transport Layer Security) is a cryptographic protocol that provides secure communication over a network, commonly used to secure HTTP traffic (i.e., HTTPS). Here’s a high-level overview of the TLS workflow, which includes handshake and data transfer phases.
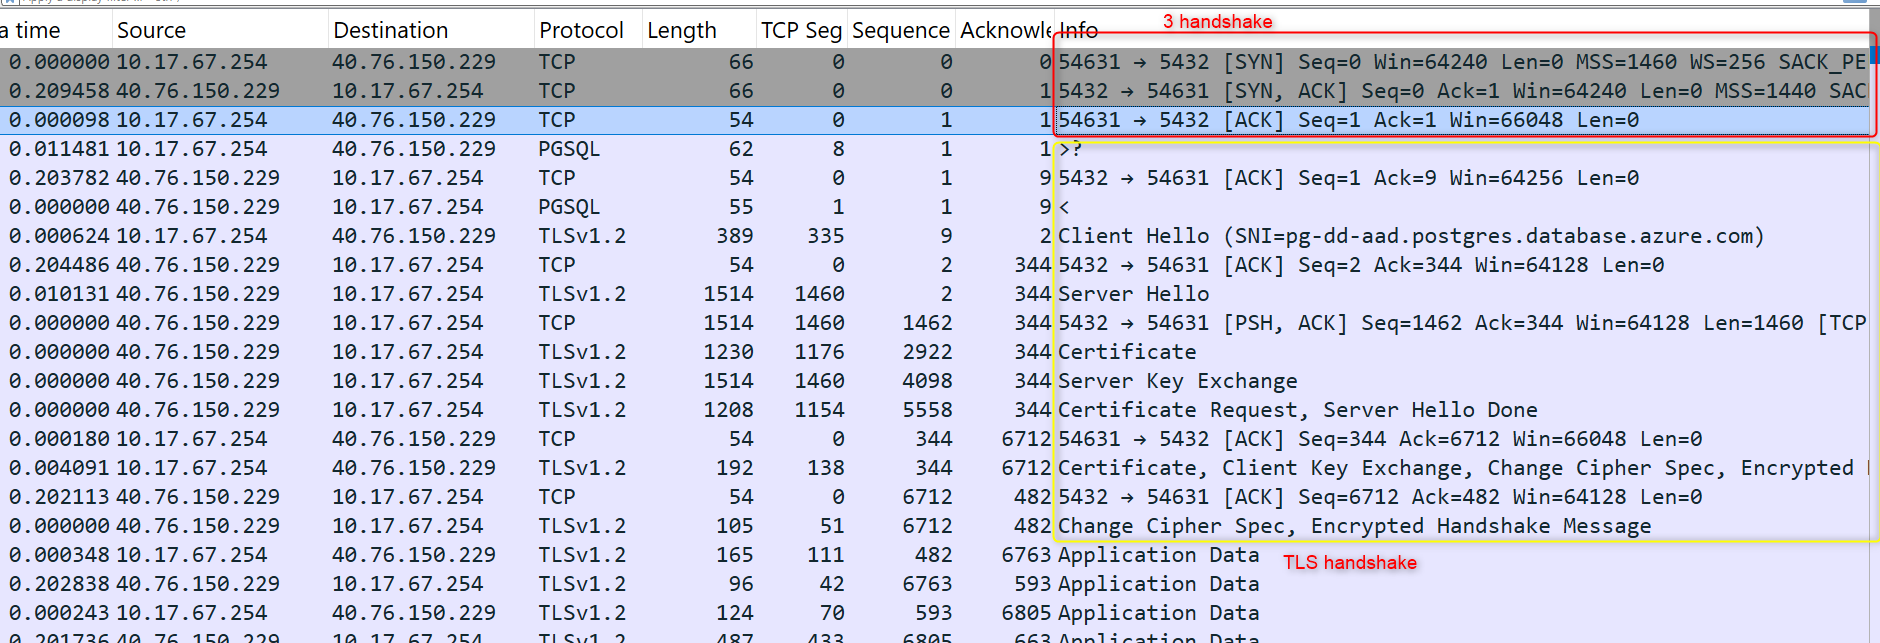
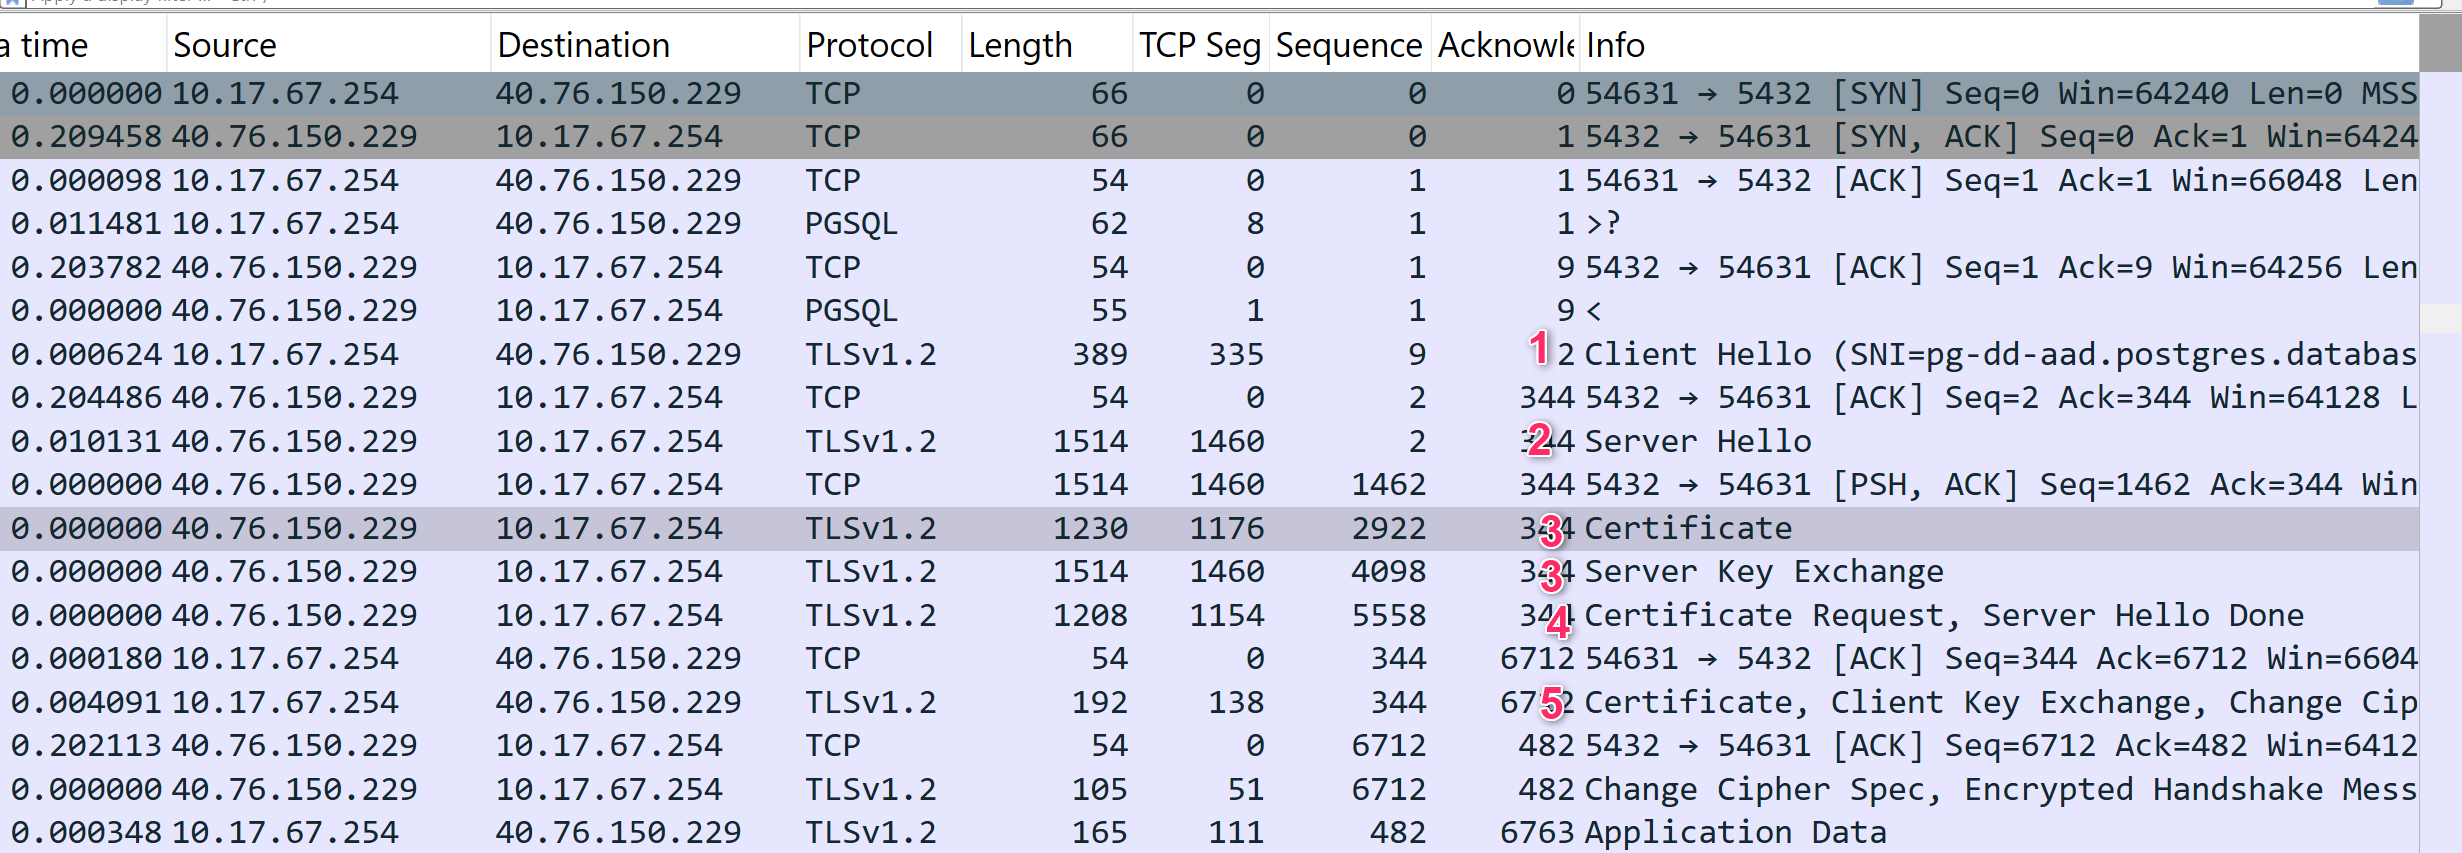
After TCP handshake, it will execute TLS handshake if client require.
Below image is my experiment TLS (TLS 1.2) workflow from PostgreSQL server, Red-frame represent TCP 3 handshake, and yellow-frame represent TLS handshake.
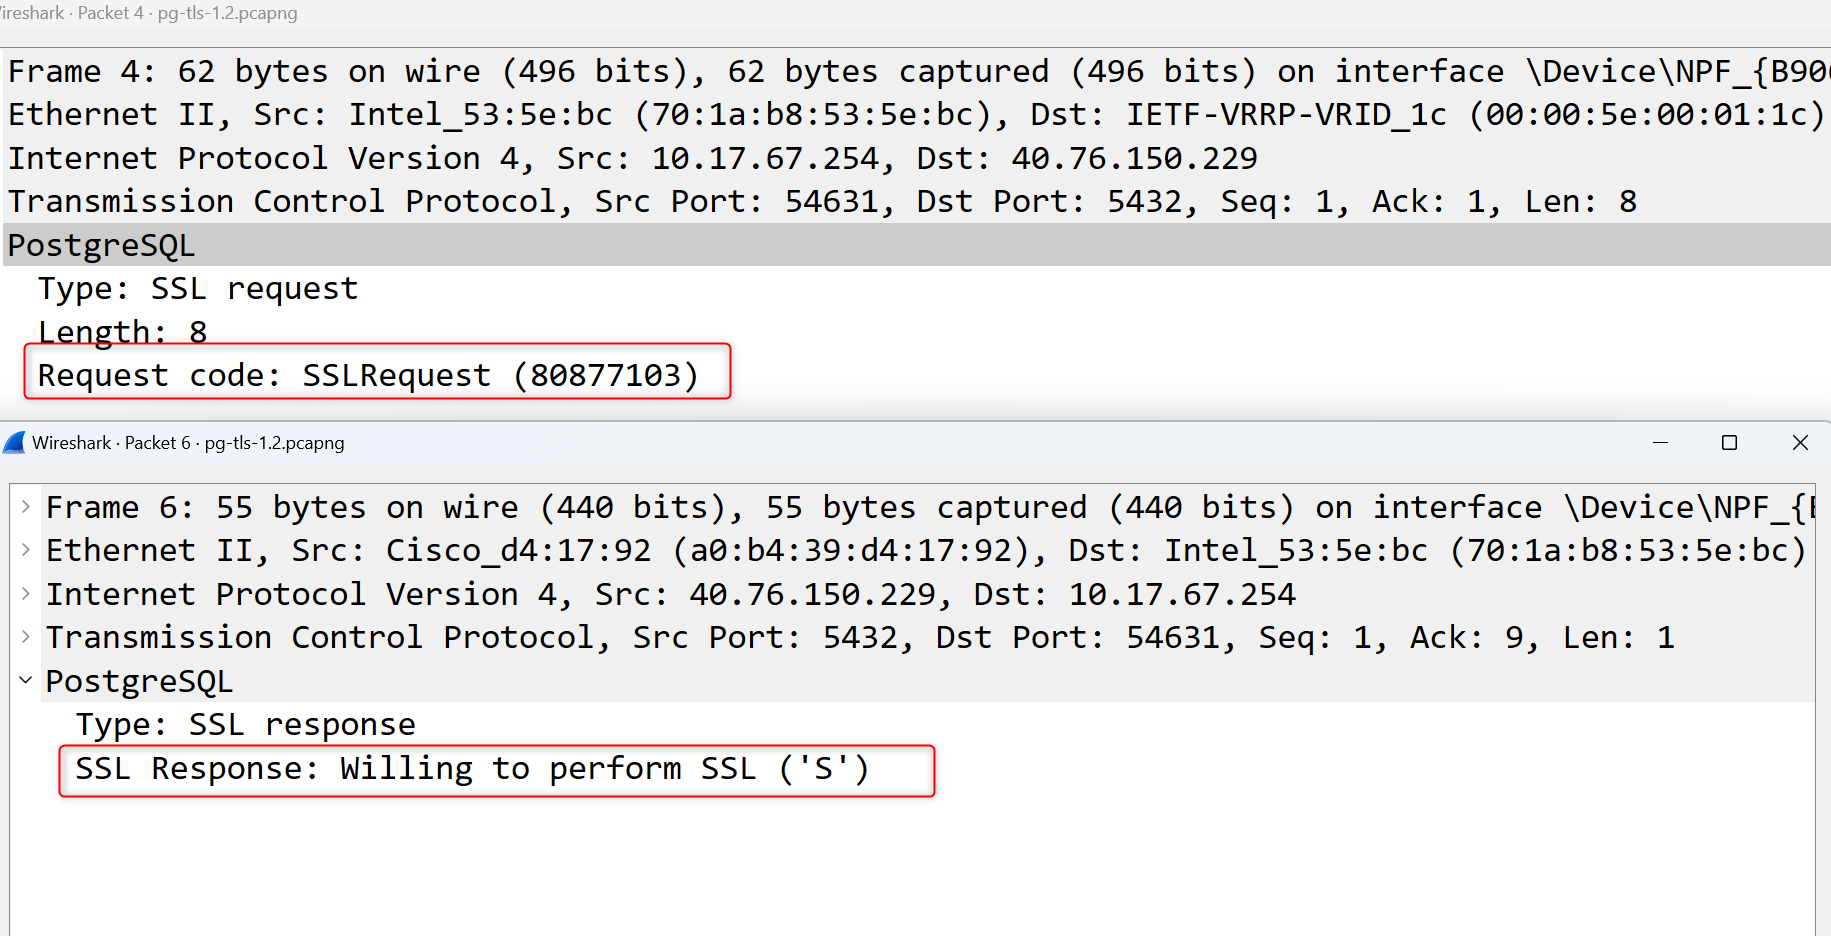
In the beginning, client will send a request to require sslmode connection (SSL/TLS), if server support it will reply (‘S’).
Eventually, processing below steps to do TLS handshake.
A list of cipher suites (encryption algorithms) it supports.
A random number (used later for generating encryption keys).
Server Hello:
The TLS version and cipher suite that it chose based on the client’s list.
A random number (used later for generating encryption keys).
Server Certificate and Optional Server Key Exchange: The server sends its digital certificate to the client to prove its identity. This certificate includes the server’s public key and is typically signed by a trusted Certificate Authority (CA).
Checking its expiration date.
Ensuring that the certificate is signed by a CA trusted by the client’s operating system or browser.
Server Hello Done : The server sends a ServerHelloDone message, indicating it has finished its part of the handshake.
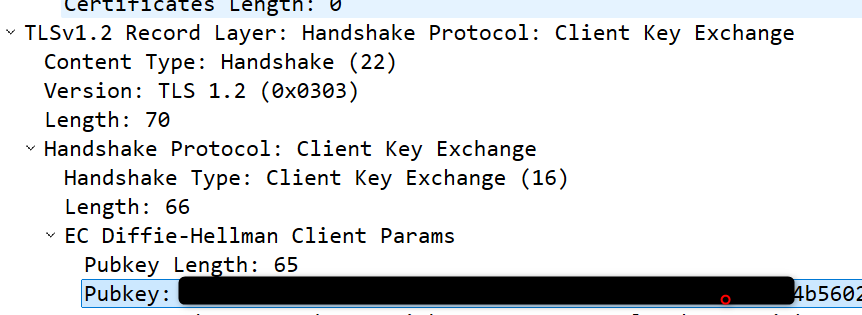
Client Key Exchange
The client generates a pre-master secret (a random value used for encryption key generation) and encrypts it with the server’s public key (from the server’s certificate).
This encrypted pre-master secret is sent to the server. Only the server, with its private key, can decrypt this secret.
Generating Session Keys: Both the client and server now have enough information (random numbers and the pre-master secret) to generate session keys.
Symmetric encryption of the data sent over the connection.
Message integrity to ensure data is not tampered with.
Above items, I pointed out in below snapshot workflow.
Certificate File
A certificate file is an important part within TLS workflow, that for doing Client Key Exchange, and client will encrypt data via public key (server side can decrypt by private key).
Certificate file contains several important pieces of information:
Public Key: The certificate includes the public key of the entity being certified (e.g., a server or individual). This key can be used to encrypt data or verify signatures.
Subject Information: Identifying information about the certificate holder, such as:
Common Name (CN) – often the domain name for websites.
Organization (O), Organizational Unit (OU).
Country (C).
Issuer Information: Identifying information about the Certificate Authority (CA) that issued the certificate.
Validity Period: The start and end dates defining the period during which the certificate is valid.
Digital Signature: A cryptographic signature from the CA, which verifies the certificate’s authenticity.
Certificate Serial Number: A unique identifier for the certificate issued by the CA.
Certificate & Root Certificate file
Root Certificate file: A root certificate is the top-level certificate in a certificate chain and serves as the foundation of trust for all other certificates within the hierarchy.
Lifespan: Root certificates are used to issue intermediate certificates, which in turn issue end-entity certificates. This hierarchy enhances security by limiting direct exposure of the root certificate.
Certificate file: This type of certificate is used to verify the identity of an entity, like a website, individual, or organization, and is typically issued by an intermediate certificate, not directly by the root.
Lifespan:They usually have shorter lifespans (often 1-2 years) to enhance security through periodic renewal and revocation if compromised.
Certificate file would be verified whether valid by Root certificate, and OS machine would install Root certificate file when we setup our machine.
The root certificate is the trust anchor, while end-entity certificates rely on this anchor for trust. This hierarchy allows a scalable, secure infrastructure where trust flows from the root certificate down to the individual end-entity certificates.
In PostgreSQL, there isn’t a native foreach loop construct in C, because C itself doesn’t have a foreach loop as you might find in higher-level languages like Python or PHP. However, PostgreSQL often implements loop iterations over elements using Macros that simplify the handling of data structures, such as linked lists, which are commonly used within its codebase.
Common Loop Macros in PostgreSQL
lfirst(lc):
This macro retrieves the data stored in a ListCell. The ListCell structure typically contains a union that can hold various types of pointers (like void*, int, etc.). The ptr_value is a generic pointer that can point to any node or structure, and lfirst simply casts it back from the void *.
lfirst_node(type, lc):
This macro is used when the list elements are known to be of a specific node type, which is common in the parser and planner where lists often contain specific types of nodes (e.g., expression or plan nodes). lfirst_node uses castNode to cast the pointer retrieved by lfirst to the specified type, ensuring type safety and readability in the code.
castNode(_type_, nodeptr):
A simple cast to the specified type _type_. It enhances readability and ensures that the casting is explicit in the code, which is crucial for understanding that a type conversion is taking place, particularly when navigating complex data structures common in PostgreSQL’s internals.
The ListCell union consists of a single member, ptr_value, which is a generic pointer (void *).
This pointer can hold a reference to any type of data, allowing for flexibility in what kind of data the list can contain. This structure is useful for managing lists of generic data types.
The List structure represents a dynamic list in PostgreSQL. It contains:
length: An integer that specifies the current number of elements in the list.
elements: A pointer to an array of ListCell elements, which holds the actual data in the list. This array can be re-allocated as the list grows or shrinks, allowing for dynamic resizing.
The comment suggests that sometimes ListCell elements may be allocated directly alongside the List structure itself. This can optimize memory usage and improve performance.
typedefstructList { intlength;/* number of elements currently present */ ListCell *elements;/* re-allocatable array of cells */ } List;
The ForEachState structure is used to manage state while iterating over a list in PostgreSQL.
l: A constant pointer to the list being iterated. The list is not meant to be modified during iteration.
i: An integer tracking the current index of the element in the list being processed. This helps keep track of the iteration progress.
These structures work together to handle lists of data in PostgreSQL, providing the flexibility to work with generic data types and iterate over lists efficiently and safely. The List structure allows for dynamic lists, while ForEachState helps manage the state of iteration over the list.
1
2
3
4
5
6
typedefstructForEachState { const List *l;/* list we're looping through */ inti;/* current element index */ } ForEachState;
Here is the sample code, we can easy use foreach to iterator List* objects.
]]>
https://isdaniel.github.io/c_foreach/2024-04-17T14:30:11.000ZIn PostgreSQL, there isn't a native foreach loop construct in C, because C itself doesn't have a foreach loop as you might find in higher-level languages likeC language implement foreach2026-07-31T03:57:00.852Z